A few projects
I've been playing around with a few projects, really just toying with some new things. One has been spurs. I've worn spurs off and on for years, but almost never with my fighting gear, since the ones I have are very nice, gold plated, and somewhat soft. But St. George wore them, so I should too. Making a spur is practically impossible unless you do some hot work, either casting or forging. The spurs I wear were cast off an original pair, which is why they're so flexible, but it looks to me like the originals were forged.
So I started with some half round stock I picked up (super cheap!) at Metals 4 You here in Austin. I heated parts of them up with my torch, tapered the arms with my a couple different cross pein hammers, flared the middle where it hits the Achilles tendon with a ball pein, flattened and spread the tips of the arms, and put in the bends. Half round stock is also half flat- so it doesn't like to do a bend against its thick plane. It needs some direct heat, support from two points like in a swedge block, and I found a straight pein hammer worked well to get the shape. All that gets me to here:
 Then it needs to be bent into an arch to wrap around the heel, and have the flanges to hold the rowel welded on. Those originally were either forge welded on, riveted on, or split off from the body of the arms of the spur. I have the welder laying around, so that's what I used. I punched holes for the straps with one of my giant Whitney punches. Below you see the one I'm doing on the left, and the one I'm copying on the right.
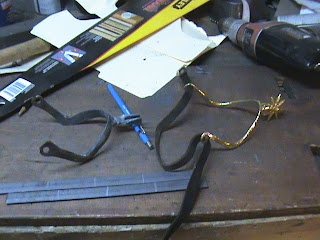 They need some clean up still. They're pretty fun to do though the welding is a bit fiddly. I'll have to try the smaller welding tips I bought.
I made a little book of pictures of late 14th century spurs to get a better feel for what these were like. It looks like many of them were made from rounder rod. It's a bit easier to do than the approach I took, so I may move in that direction. The rowel could be welded together, cut from thick stock or cast. It's not clear to me what the best path is there yet.
I did a quick project for Jeanne-Marie to display her hats on. It was really just a matter of cutting some wood, countersinking a hole and screwing the pieces together. Still, they turned out nice:
 Last week Jovian showed me a nice 6 board chest he built. He offered to build me one, and I offered to smith some handles for him. The research into chest hardware I did was eye opening. The handles on the 14th and 15th century chests were nothing like I expected. Some were wide bars which brace against plates on the chest. Hopefully Master Terafan won't mind me swiping his picture from this chest from Alsace:
 The extra plates to keep the handle from digging into the wood were a bit invasive, so I opted to mimic this design:
 It's an oak chest from the early 14th century, All Saints' Church, Stansfield, Suffolk. It looks like the handle is twisted iron with an eye ring staple. Historic Enterprises sells a similar design which reaches over the top of the chest to accommodate a carrying pole. They have some nice research pics which I'm not going to steal. Here's how I made my rendition-
Heat a couple of bars in the forge- a torch won't do the trick since the whole bar has to be hot to get a uniform twist:
 Then twist them by bracing the hot bar in the vice and grabbing with vice grips (this part is really fun):
 Then bend in a circle. Pounding it around a ball stake ended up being the easiest. I found a weird trick to smack the ring back into a single plane (i.e. a ring rather than a saddle shape which it wanted to be in) -using the giant piston valves Ysfael gave me. They're bigger than the handle I was making, so you can smack the whole thing at once. If it's red hot a couple taps is all it takes.
They're pretty tough without anything more, but just to be thorough I welded the rings closed:
 Tonight I tapered some round stock by heating the end and pounding it at an angle on the anvil face. Then I slapped that in a vice, and tapped the head into a loop to wrap around the handle. The result looks like this:
 It might make you want to play Quake. Sorry about that. The points get nailed into the wood, and probably bent over to hold in.
I heat treated some stuff for Master Peter a couple nights ago, and he brought over a big thick piece of steel he calls a "helmet cradle" which provides a nice non-rolly surface to weld a helmet in. It's the beam leaning against the stumps: He's very generous with tools, so I intend to pay his generosity forward. I cut the beam in half, which suits my needs better, and lets me give away the other half. It will make a nice portable anvil or even a helmet cradle for someone. It was almost a half inch thick in places, so it gave me a chance to really rev up the cutting torch. In the words of St. Bevis, "Fire is cool!"
So here's the great beam cloven in twain by the breath of a firey wind:
 I'll give one of them to the first local person to post an interest in it here.
Last project of the evening- a cudgel for Ysfael. I started with the thickest rattan I've ever seen:
 Which I slapped on the lathe and turned into a mean old bat:

So I started with some half round stock I picked up (super cheap!) at Metals 4 You here in Austin. I heated parts of them up with my torch, tapered the arms with my a couple different cross pein hammers, flared the middle where it hits the Achilles tendon with a ball pein, flattened and spread the tips of the arms, and put in the bends. Half round stock is also half flat- so it doesn't like to do a bend against its thick plane. It needs some direct heat, support from two points like in a swedge block, and I found a straight pein hammer worked well to get the shape. All that gets me to here:
 Then it needs to be bent into an arch to wrap around the heel, and have the flanges to hold the rowel welded on. Those originally were either forge welded on, riveted on, or split off from the body of the arms of the spur. I have the welder laying around, so that's what I used. I punched holes for the straps with one of my giant Whitney punches. Below you see the one I'm doing on the left, and the one I'm copying on the right.
 They need some clean up still. They're pretty fun to do though the welding is a bit fiddly. I'll have to try the smaller welding tips I bought.
I made a little book of pictures of late 14th century spurs to get a better feel for what these were like. It looks like many of them were made from rounder rod. It's a bit easier to do than the approach I took, so I may move in that direction. The rowel could be welded together, cut from thick stock or cast. It's not clear to me what the best path is there yet.
I did a quick project for Jeanne-Marie to display her hats on. It was really just a matter of cutting some wood, countersinking a hole and screwing the pieces together. Still, they turned out nice:
 Last week Jovian showed me a nice 6 board chest he built. He offered to build me one, and I offered to smith some handles for him. The research into chest hardware I did was eye opening. The handles on the 14th and 15th century chests were nothing like I expected. Some were wide bars which brace against plates on the chest. Hopefully Master Terafan won't mind me swiping his picture from this chest from Alsace:
 The extra plates to keep the handle from digging into the wood were a bit invasive, so I opted to mimic this design:
 It's an oak chest from the early 14th century, All Saints' Church, Stansfield, Suffolk. It looks like the handle is twisted iron with an eye ring staple. Historic Enterprises sells a similar design which reaches over the top of the chest to accommodate a carrying pole. They have some nice research pics which I'm not going to steal. Here's how I made my rendition-
Heat a couple of bars in the forge- a torch won't do the trick since the whole bar has to be hot to get a uniform twist:
 Then twist them by bracing the hot bar in the vice and grabbing with vice grips (this part is really fun):
 Then bend in a circle. Pounding it around a ball stake ended up being the easiest. I found a weird trick to smack the ring back into a single plane (i.e. a ring rather than a saddle shape which it wanted to be in) -using the giant piston valves Ysfael gave me. They're bigger than the handle I was making, so you can smack the whole thing at once. If it's red hot a couple taps is all it takes.
They're pretty tough without anything more, but just to be thorough I welded the rings closed:
 Tonight I tapered some round stock by heating the end and pounding it at an angle on the anvil face. Then I slapped that in a vice, and tapped the head into a loop to wrap around the handle. The result looks like this:
 It might make you want to play Quake. Sorry about that. The points get nailed into the wood, and probably bent over to hold in.
I heat treated some stuff for Master Peter a couple nights ago, and he brought over a big thick piece of steel he calls a "helmet cradle" which provides a nice non-rolly surface to weld a helmet in. It's the beam leaning against the stumps:
 He's very generous with tools, so I intend to pay his generosity forward. I cut the beam in half, which suits my needs better, and lets me give away the other half. It will make a nice portable anvil or even a helmet cradle for someone. It was almost a half inch thick in places, so it gave me a chance to really rev up the cutting torch. In the words of St. Bevis, "Fire is cool!"
So here's the great beam cloven in twain by the breath of a firey wind:
 I'll give one of them to the first local person to post an interest in it here.
Last project of the evening- a cudgel for Ysfael. I started with the thickest rattan I've ever seen:
 Which I slapped on the lathe and turned into a mean old bat:

Comments
I could use some of that helm-cradling goodness.