Greave tutorial
Some folks say that well sculpted greaves are the hardest piece of armour to make. When we're talking about greaves that look like medieval greaves, fit the wearer well, and function well, the two big challenges to my mind are: 1. Truly seeing the shapes you need to form and 2. Convincing the steel to be shaped like that, because really, it doesn't want to be. Not even a little.
So before we get into that second part, take off your shoes and socks, and roll up your pants. Take them off if you want, I won't judge. Take a good look at your shin. Check it out from the side. The big thing to spot here is that when you see this in profile, it's not a straight line.
 You don't want the greave to dig up under you knee cap where that small depression is, so we can pretend it's mostly flat from the top of the greave to about a third of the way down the shin. It's not 100% true, but close enough, OK? After that, mine tapers down toward the ankle bone fairly dramatically, before flaring out again at the top of the foot. Now you can make a greave with a very rough approximation of that tapering in, but modeling it like a cone, then flaring the bottom. That's essentially what I was doing a few years ago, and you can get a feel for those results here. If this is your first try at greaves, your tools or time are limited, try that approach. With some determination and skill your result will be better than most of the greaves out there. The same cone with a flare will even work for the calf. The whole thing can look angular and a little bulky and robotic, but it's nicer than naked shins.
In the calf we can see the bulge of the calf muscle, and the taper toward the ankle. You knew that part. Now trace the shin and the calf onto some card stock or card board. Cut it out, and you'll have a template of what your greave should approximate. This isn't a pattern, it's a rough stab and the curves you need to form, as a silhouette.
Let's look at the leg from the front.
 The rough cut- it bulges out around the calf muscle and tapers down to the ankle. But it's not symmetrical. The outside is mostly a simple, smooth arc. The inside is a deeper S curve, with an apex somewhere between a third and half way down the calf. Take a good look at your own leg. Trace it. Draw the leg. Massage it. Go jump some rope. Now trace it again. If it doesn't fit with a bunch of blood pumping through it you're going to have some uncomfortable armour. I'm not kidding. Go work out and see how much this thing changes.
Move your ankle around to get a feel for the range of motion you have to accommodate.
Sorry that I sound like you've never looked at your own legs, but most of this isn't obvious to folks who don't do a lot of drawing or sculpture. And sculpture is what you're doing. Put on your beret and be zee artiste!
Ok, so that's what your leg looks like. What did medieval greaves look like? Definitely dig through all the images you can find of original legs. Extant legs are generally the best ones to check out, though sculptures can be good if the sculptor was attentive to details. Paintings are most helpful as they get more realistic in the 15th century. An amazing thing you'll see as you dig through the art here is the emerging Renaissance, and the growth of humanism- by which I mean the more thorough awareness of the human form. Michelangelo wasn't the first one to really study it in gory detail. You'll see armour from the 13th century, and even most 14th century stuff before the Black Death (circa 1348) is blocky, and simplistic. Let's check out greaves from Chartres, The Black Prince's tomb, St. George in Dijon, and Bertrand du Guesclin (who was a total bad ass, look him up).
 This belonged to the Dauphin of France. Despite him being a kid, you notice his calf is shaped a lot like mine. Some neat details to spot are that the seam between the front and the back of the greave don't make a straight line. The square cut outs are for hinges that haven't survived. It looks like they flared the greave out a bit at the top of the shin. This keeps it from jamming into the tender area below the knee when your leg extends all the way, or if the greave gets pushed to rotate farther than your leg.
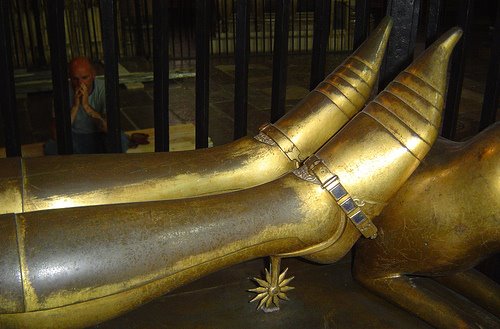
 These put the b in subtle. You can still see that the shin tapers in toward the heel above the ankle bone, and then flares back out to lay tangent to the arc of the foot. It's great to see how it plays with the sabaton and the spurs. There's also a bit of maile poking out between the greave and the sab. Either that stuff was really thin and light, or Edward was super-model thin.

 St. George has similiarly subtle lines. His have a deep crease though, and a more angular prow because of it. So to do these right you'll have to lay the crease down along that S curve of the shin. He's more stylized, so he has some very thin ankles.
Bertrand (right) also has slender ankles, but a more realistically pronounced pull in of the shin toward the heel like my legs have.
So these examples show that sculptors and armourers in the 14th century were aware of the exact curves of the shin, and mimicked them in the armour they created. If you model your greaves on your own legs, you'll get to partly cut out the middle man of the medieval art to make something that fits you and looks right.
OK, so how do we make these shapes? Start with a flat pattern which will look roughly like the ones below. I'm liking 18 gauge spring steel for my versions right now since it gives you some room for error, sanding, and it will withstand some of the torture of the crazy Europeans I'll be fighting this spring. Trace them onto your metal, mark a center line, and cut them out. What you see there 1. Might not fit you depending on the proportions of your calf muscle to ankle thickness. 2. Are both calf sides really. 3. Are an older design I was using a few years back. The calf part and the ankle part in my most recent patterns are more similar in width, and on my shin pattern the ankle lobes flare outward a bit to give me some more metal to work with for the flare over the arch of the foot. So it's a good exercise to derive your own patterns. Shoot me a message if you get stuck.
 Put these into a simple curved swage, and dish them into a gutter shape. Planish them smooth(ish). I like a plastic hammer to do that forming which reduces the planishing you have to do later. They don't have to be perfectly smooth, but wrinkles that might end up folding over on themselves are fatal. They can be near impossible to get out and can crack, so pound the bumps down. To planish, I took a candlestick stake (the brown stake), and welded a little rod on the end which I heated with my torch, bent up, and ground flush to hold the shiny shallow cone of a bracelet mandrel on it. Both stakes are pretty common on ebay, and the modification took me about 10 minutes. The stake plate that holds them is a Pexto brand, also common on ebay, and the stool it's mounted into is from Ikea. Props to Master Peter of the Golden Isles for the stake plate tips, and the loan of the bracelet mandrel (which still pops right off the hook on the end if you need it back). A very shallowly domed hammer like the one pictured here planishes pretty well from the outside.
 I made the ball stake on the left from a cannon ball and some round and square stock. It's small enough to get inside the greave for a lot of shaping.
For the calf, you'll want to dish the muscle part out a lot like you would with a cop. I like a large round dishing hammer and a fairly shallow bowl for this, and then a big round ball to planish it some. The shin doesn't get that extra shape. The calf should look something like this at this point:


So the greave is fairly smooth, and shaped like a gutter. You're ready for the hot work! I made a stand for my oxy-acetyline torch so I can wave the metal in the flame for a bit, and go right back to hammering without picking the torch up, putting it down, and losing all my heat. Having a buddy help you out works too, and it may even be safer, but I love my torch stand. Oxy-acetyline isn't strictly necessary for this either. I understand that Jeff Hedgecock uses a propane or oxy-propane rig which may be more cost effective. I've seen Jeffrey the Younger use a fire brick based setup. I like the oxy-acetyline rig because it heats up fast, it takes me a long time to burn through all the gas, and the heat can be focused to a small area.
Safety first- ventilation is important, as are goggles and I like working with a welding glove on my left (holding) hand. Tongs could work in place of the glove, but I feel I get better control with the glove. The full dark tinted welding goggles are perfect for when you're using the cutting torch, or welding stuff all day, but they're too dark for hot work IMO. I use didymium glasses like some glass workers use. It cuts a lot of the UV and IR out, and protects your peepers from sparks and hot forge scale without leaving you fumbling in the dark.
Why heat? If you just try to pound the saddle shapes into your greave, it flattens out. Steel doesn't like bending into that shape much, so it needs some help. When you heat a small area it lets you deform just that bit, leaving the rest effectively untouched. To be clear, I've made some greaves without doing them hot. It's bitch to do, and you don't get the control you want to get the more complex, graceful and correct shapes.
So get a circle about 4cm wide red hot with your torch, brace the greave over the raising stake, and start tapping it down with a fairly broad faced raising hammer. This is what my stakes and hammer look like:
 I use the center one for the middle of the arc of the greave, and the bent legged one for working the edges. Halberds on the Armour Archive made the stakes out of some pipes, thick square stock, and some bad-ass-ninja-welding-fu. The hot spot should be over the void in the middle of the stake, and you probably don't want to pound it all the way down to bottom out here. These guys aren't all that wide, so they'd create too acute a bend. Check your template. The lines you're forming will be a little more exaggerated since you'll lose some curve when you planish, but it's still fairly stuble.
Don't bite off too much to pound at a time, and particularly if you're working in spring steel, don't work it cold too much or your can easily crack it. There's usually a phase where it just resists your pounding before the cracking starts. So you'll pound a bit, heat, pound some more, doing lots of humble passes, pushing the metal down into that curve from mid shin to your ankle. Think of it a little like clay, and you're squeezing it down a little at a time, almost like forming a narrow neck on a pot on a spinning wheel. Don't push too hard on any individual pass, or difficult wrinkles will form. After several passes and a little planishing on the bracelet mandrel, and you'll have a shape like this:
 So the ankle is pulling in well, though you can see some small wrinkles around the ankle bone. Not a big deal yet. It's flaring out a little still by the heel (that's in the upper right of the picture). The rainbow lines are from the edge of the hot spots I made.

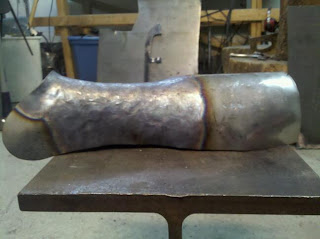 So, not as deep a curve since there's no calf bulge, but there is a flare out over the top of the foot. Do that flare hot too. The raising stakes I have work well for it, working with a straight peen from the inside. A simple U shape on a swedge block works great too.

 See how the ankle's smoother, more graceful and just more right than the one from the previous pass? This will get tighter still when I put the crease down the front.
 Planish, sand, and polish to get to here:

So before we get into that second part, take off your shoes and socks, and roll up your pants. Take them off if you want, I won't judge. Take a good look at your shin. Check it out from the side. The big thing to spot here is that when you see this in profile, it's not a straight line.

In the calf we can see the bulge of the calf muscle, and the taper toward the ankle. You knew that part. Now trace the shin and the calf onto some card stock or card board. Cut it out, and you'll have a template of what your greave should approximate. This isn't a pattern, it's a rough stab and the curves you need to form, as a silhouette.
Let's look at the leg from the front.

Move your ankle around to get a feel for the range of motion you have to accommodate.
Sorry that I sound like you've never looked at your own legs, but most of this isn't obvious to folks who don't do a lot of drawing or sculpture. And sculpture is what you're doing. Put on your beret and be zee artiste!
Ok, so that's what your leg looks like. What did medieval greaves look like? Definitely dig through all the images you can find of original legs. Extant legs are generally the best ones to check out, though sculptures can be good if the sculptor was attentive to details. Paintings are most helpful as they get more realistic in the 15th century. An amazing thing you'll see as you dig through the art here is the emerging Renaissance, and the growth of humanism- by which I mean the more thorough awareness of the human form. Michelangelo wasn't the first one to really study it in gory detail. You'll see armour from the 13th century, and even most 14th century stuff before the Black Death (circa 1348) is blocky, and simplistic. Let's check out greaves from Chartres, The Black Prince's tomb, St. George in Dijon, and Bertrand du Guesclin (who was a total bad ass, look him up).

 These put the b in subtle. You can still see that the shin tapers in toward the heel above the ankle bone, and then flares back out to lay tangent to the arc of the foot. It's great to see how it plays with the sabaton and the spurs. There's also a bit of maile poking out between the greave and the sab. Either that stuff was really thin and light, or Edward was super-model thin.
  St. George has similiarly subtle lines. His have a deep crease though, and a more angular prow because of it. So to do these right you'll have to lay the crease down along that S curve of the shin. He's more stylized, so he has some very thin ankles.
Bertrand (right) also has slender ankles, but a more realistically pronounced pull in of the shin toward the heel like my legs have.
So these examples show that sculptors and armourers in the 14th century were aware of the exact curves of the shin, and mimicked them in the armour they created. If you model your greaves on your own legs, you'll get to partly cut out the middle man of the medieval art to make something that fits you and looks right.
OK, so how do we make these shapes? Start with a flat pattern which will look roughly like the ones below. I'm liking 18 gauge spring steel for my versions right now since it gives you some room for error, sanding, and it will withstand some of the torture of the crazy Europeans I'll be fighting this spring. Trace them onto your metal, mark a center line, and cut them out. What you see there 1. Might not fit you depending on the proportions of your calf muscle to ankle thickness. 2. Are both calf sides really. 3. Are an older design I was using a few years back. The calf part and the ankle part in my most recent patterns are more similar in width, and on my shin pattern the ankle lobes flare outward a bit to give me some more metal to work with for the flare over the arch of the foot. So it's a good exercise to derive your own patterns. Shoot me a message if you get stuck.


For the calf, you'll want to dish the muscle part out a lot like you would with a cop. I like a large round dishing hammer and a fairly shallow bowl for this, and then a big round ball to planish it some. The shin doesn't get that extra shape. The calf should look something like this at this point:


So the greave is fairly smooth, and shaped like a gutter. You're ready for the hot work! I made a stand for my oxy-acetyline torch so I can wave the metal in the flame for a bit, and go right back to hammering without picking the torch up, putting it down, and losing all my heat. Having a buddy help you out works too, and it may even be safer, but I love my torch stand. Oxy-acetyline isn't strictly necessary for this either. I understand that Jeff Hedgecock uses a propane or oxy-propane rig which may be more cost effective. I've seen Jeffrey the Younger use a fire brick based setup. I like the oxy-acetyline rig because it heats up fast, it takes me a long time to burn through all the gas, and the heat can be focused to a small area.
Safety first- ventilation is important, as are goggles and I like working with a welding glove on my left (holding) hand. Tongs could work in place of the glove, but I feel I get better control with the glove. The full dark tinted welding goggles are perfect for when you're using the cutting torch, or welding stuff all day, but they're too dark for hot work IMO. I use didymium glasses like some glass workers use. It cuts a lot of the UV and IR out, and protects your peepers from sparks and hot forge scale without leaving you fumbling in the dark.
Why heat? If you just try to pound the saddle shapes into your greave, it flattens out. Steel doesn't like bending into that shape much, so it needs some help. When you heat a small area it lets you deform just that bit, leaving the rest effectively untouched. To be clear, I've made some greaves without doing them hot. It's bitch to do, and you don't get the control you want to get the more complex, graceful and correct shapes.
So get a circle about 4cm wide red hot with your torch, brace the greave over the raising stake, and start tapping it down with a fairly broad faced raising hammer. This is what my stakes and hammer look like:

Don't bite off too much to pound at a time, and particularly if you're working in spring steel, don't work it cold too much or your can easily crack it. There's usually a phase where it just resists your pounding before the cracking starts. So you'll pound a bit, heat, pound some more, doing lots of humble passes, pushing the metal down into that curve from mid shin to your ankle. Think of it a little like clay, and you're squeezing it down a little at a time, almost like forming a narrow neck on a pot on a spinning wheel. Don't push too hard on any individual pass, or difficult wrinkles will form. After several passes and a little planishing on the bracelet mandrel, and you'll have a shape like this:


This is from the inside of that same calf. I still need to pull in the sides a fair bit. I focused on that in later passes partly because I use different stakes for the deep part of the greave (the apex of the arc) and the edges.
The shin in a similar state (pre-crease) looks like this:


I pulled the area in around the sides of the ankle in some. Notice that the bulges around the upper calf aren't symmetrical. The muscles on the inside of the calf make that smoother arc down to the ankle, and on the outside it's a more abrupt bump with the deepest part lower down toward the foot. So this is a right leg.
This is after another set of passes, pushing the shin down a little more, and pulling the ankle in more:

More heat, more raising passes, more planishing. You may have to anneal it if you find you have to do large scale changes, like if it's too tight or too loose around your leg. Fit it often, and do so wearing what you'll wear to fight in. I can wear these under jeans and they're invisible because they're shaped like my leg. Over jeans, they're uncomfortably tight. I've found that planishing hot works faster and with less annoyance, though if you're working with mild steel you can totally do that step cold. Here are some pieces in the forge getting a hot soaking before the slow cool down step to soften (anneal) them.

From this point you'll have to match the front and the back so they fit without gaps between. There are few universal statements in how armour was configured, but it looks like the calf edges tended to nest inside the shin plate's edges so you wouldn't catch any weapon tips in your greaves. I've seen the hinges on the inside and the outside, though it feels like the straps and buckles would be less likely to rub if they're on the outside. They'd be easier to buckle up on the inside though.
If you've gone to this much trouble you should make your own hinges and at least chose some pretty buckles. From here on in, it's small adjustments, lots of comparing plates, checking fit, and polishing. I hope you make a set and post some links to your work!
Addendum: My friend Maelgwyn recently made a blog entry on tooled leather greaves that's well worth checking out here.
Comments